SHV 5 KV
Coaxial Cable RG-59/U
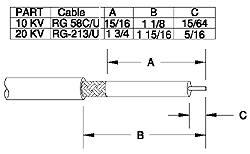
Slide the grip sleeve over the cable. Trim the end of the cable to the dimensions shown.
Tin end of the cable and inside of contact. Solder the contact to the center conductor. Flare out the braid without fraying.
Push the assembled contact into the plug body until the dielectric bottoms against the shoulder within the plug body. At this point, the body grip fingers should be under the flared braid as shown.
Slide the grip sleeve forward against the plug body, over the braid and crimp as shown. Use Kings Hand Crimp Tool #KTH-1000 and Crimp Die #KTH-2062.
NOTE: Before assembly be sure you can distinguish between the cable seal and the interface seal. The cable seal has a .09″ hole and is .10″ thick. However, the interface seal has a .13″ hole and is .07″ thick. Do not interchange.
Coaxial cables: RG-8/U
Slide the crimp sleeve over the cable. Trim the end of the cable to the dimensions shown and tin the exposed conductor.
Slip cable seal over center conductor then slide contact over conductor. Push contact against cable seal and maintain this slight pressure while soldering contact in place through solder hole.
Flare out braid without fraying the ends. Insert prepared cable assembly into the plug body carefully. DO NOT pinch or otherwise damage cable seal. Guide braid smoothly over the splined crimp area of the body until the contact shoulder butts against the inner insulator.
Slide the grip sleeve into position and crimp as shown. Use CeramTec’s Crimping Tool #2840-02 or Thomas and Betts Crimping Tool #WT-540 with Crimping Die #5452. Make sure braid does not extend beyond the end of the grip sleeve. Insert interface seal into the open end of the plug. Carefully slide the interface seal over contact until it bottoms evenly around the contact.
To obtain the Thomas & Betts Crimp Tool contact: Thomas & Betts Corp., 1001 Frontier Rd., Bridgewater, NJ 08807, Phone: 1-908-685-1600, Fax: 1-908-707-2145
To obtain the Kings Hand Crimp Tool contact: Kings Electronics Co., Inc., 40 Marblehead Rd., Tucahoe, NY 10707, Phone: 1-914-793-5000, Fax: 1-914-793-5092


